现在有一大堆软路由系统 https://en.wikipedia.org/wiki/List_of_router_and_firewall_distributions,都不知道那个好,那个不好。
这么多系统,也不可能一个一个去安装测试,那不如自己试试用 Ubuntu 设置一台路由。
硬件(迷你电脑):
Intel n3150 CPU, 4GB RAM, 64GB SSD
Realtek Giga LAN x 2
Intel N-7620 Wireless LAN x 1
软件系统:Ubuntu Server 16.04.2 LTS
Ubuntu 系统的安装,SSH 的安全设置(禁止密码登录,4096 bits key)等就不详细说了。
以下内容包括:
修改 Network Device Name
创建 bridge, br0 (eth1 + wlan0)
设置无线 Access Point (hostapd)
安装 dnsmasq 作为 DNS 和 DHCP 服务器
iptables rules (firewall + Port Forwarding)
DDNS
overlayroot
其他脚本
WAN-to-LAN 速度测试
1. 修改 Network Device Name
Ubuntu 从前一两个版本开始,网卡的名称就不是 eth0, eth1, wlan0 等,使用起来很不习惯。所以第一步是把它们改回原来的命名方式。
创建一个档 : /etc/udev/rules.d/70-persistent-net.rules
SUBSYSTEM=="net", ACTION=="add", DRIVERS=="?*", ATTR{address}=="xx:xx:xx:xx:xx:xx", ATTR{dev_id}=="0x0", ATTR{type}=="1", NAME="eth0"
SUBSYSTEM=="net", ACTION=="add", DRIVERS=="?*", ATTR{address}=="xx:xx:xx:xx:xx:xx", ATTR{dev_id}=="0x0", ATTR{type}=="1", NAME="eth1"
SUBSYSTEM=="net", ACTION=="add", DRIVERS=="?*", ATTR{address}=="xx:xx:xx:xx:xx:xx", ATTR{dev_id}=="0x0", ATTR{type}=="1", NAME="wlan0"
上面 "xx:xx:xx:xx:xx:xx" 是每张网卡的 MAC 地址(可以用 ifconfig -a 来查询)
(不要忘了)然后修改 /etc/network/interfaces,将里面的网口名称改回 eth0,eth1,wlan0,存档,重启...
重启后三张网卡的名称已经改变 。这三张网卡将会如此使用:
eth0 - WAN
eth1 - LAN (10.0.1.1)
wlan0 - LAN (10.0.1.1)
2. 创建 bridge, br0 (eth1 + wlan0)
就如一般的路由,我希望 eth1 和 wlan0 共用一个 LAN 地址,就如一张网卡般使用。
apt-get install bridge-utils
修改 /etc/network/interfaces:
# This file describes the network interfaces available on your system
# and how to activate them. For more information, see interfaces(5).

source /etc/network/interfaces.d/*

# The loopback network interface
auto lo
iface lo inet loopback

# The primary network interface
#auto eth0
allow-hotplug eth0
iface eth0 inet dhcp

iface eth1 inet manual
iface wlan0 inet manual

# Bridge setup
auto br0
iface br0 inet static
        bridge_ports eth1       # wlan0 added by hostapd "bridge=br0" line.
        address 10.0.1.1
        broadcast 10.0.1.255
        network 10.0.1.0
        netmask 255.255.255.0
        gateway 10.0.1.1
        bridge_stp off               # disable Spanning Tree Protocol
        bridge_waitport 0            # no delay before a port becomes available
        bridge_fd 0                  # no forwarding delay
bridge_ports 只需要 eth1 就行,wlan0 会经 hostapd 加入到 br0 里面。
3. 设置无线 Access Point (hostapd)
apt-get install hostapd haveged
haveged (看这里)非常重要。没装它的时候,无线终端(例如:手机)连上接路由后能正常使用。但当路由重启后,手机就会出现“身份验证错误”,然后自动忘记无线密码。我花了四五个小时
google,修改 hostapd.conf,甚至换无线网卡测试。后来才找到原因。不明白 Ubuntu 官方连 overlayroot
都预装了,却不预装 haveged。而且大部分的 hostapd 教程也没有提到 haveged。
返回正题。修改 /etc/default/hostapd:
DAEMON_CONF="/etc/hostapd/hostapd.conf"
创建 /etc/hostapd/hostapd.conf :
interface=wlan0
driver=nl80211
bridge=br0        # Add wlan0 to br0
country_code=HK
ieee80211d=1

ctrl_interface=wlan0
ctrl_interface_group=0
ssid=YOUR-SSID
hw_mode=g
channel=6
wpa=3
wpa_passphrase=YOUR-PASSPHASE
wpa_key_mgmt=WPA-PSK
wpa_pairwise=TKIP
rsn_pairwise=CCMP
beacon_int=100
auth_algs=3
macaddr_acl=0
eap_reauth_period=360000000

ignore_broadcast_ssid=0

# enable 802.11n (n-mode)
ieee80211n=1
wmm_enabled=1
4. 安装 dnsmasq 作为 DNS 和 DHCP 服务器
apt-get install dnsmasq
修改 /etc/dnsmasq.conf
interface=lo,br0
dhcp-range=10.0.1.21,10.0.1.250,255.255.255.0,12h
cache-size=500       # 缓存多少个地址,按需要修改
DNS 服务器方面,我除了 dnsmasq 外,我还装了 dnscrypt-proxy 防止 dns 劫持 (dns 污染)。但这帖子已经很长,所以这里不写了。
现在重启路由后,手机等终端可以连接上路由了,可是还是不能上网。因为还缺少了下一步的 MASQUERADE。
5. iptables rules (firewall + Port Forwarding)
Debian/Ubuntu 的 iptables 教程,都是在 /etc/network/if-pre-up.d 里面加一个脚本来启动
iptables 规则。因为我的 Port Forwarding rules 使用到 WAN 口的 地址,所以我把 iptables 分成
if-pre-up.d 和 if-up.d 两部分。pre-up 时(eth0 还没 ip 地址 )启动 firewall filter
等,post-up 时(eth0 已经分配到 ip 地址)加上 port forwarding 规则。
if-pre-up.d 部分,创建 /etc/network/if-pre-up.d/my-pre-up :
#!/bin/sh
EXTIF=eth0
if [ "$IFACE" = "$EXTIF" ]; then
    /bin/sh /usr/myscripts/iptables/pre-up-rules
fi
创建 /usr/myscripts/iptables/pre-up-rules:
#!/bin/sh

EXTIF=eth0
INTIF=br0

LOG=/tmp/set-rules-router.log

WANIP=$(/sbin/ifconfig $EXTIF | grep 'inet addr:' | cut -d: -f2 | awk '{ print $1}')
echo "PRE-UP : `date`" | tee -a $LOG
echo "$IFACE pre-up, $EXTIF IP : $WANIP" | tee -a $LOG
echo | tee -a $LOG

SSHPORT=22222;

echo "Setting default policy and clearing all rules ..." | tee -a $LOG
# Default poliicy
/sbin/iptables -P INPUT DROP
/sbin/iptables -P OUTPUT ACCEPT
/sbin/iptables -P FORWARD DROP
/sbin/iptables -F
/sbin/iptables -X
/sbin/iptables -t nat -F
/sbin/iptables -t nat -X
/sbin/iptables -t mangle -F
/sbin/iptables -t mangle -X
/sbin/iptables -t raw -F
/sbin/iptables -t raw -X

echo "Setting up firewall rules..." | tee -a $LOG

# Ref : https://wiki.debian.org/DebianFirewall
echo -n '1' > /proc/sys/net/ipv4/ip_forward
echo -n '0' > /proc/sys/net/ipv4/conf/all/accept_source_route
echo -n '0' > /proc/sys/net/ipv4/conf/all/accept_redirects
echo -n '1' > /proc/sys/net/ipv4/icmp_echo_ignore_broadcasts
echo -n '1' > /proc/sys/net/ipv4/icmp_ignore_bogus_error_responses

# Chains :
/sbin/iptables -N syn_flood

## Protection 1 vvvvvvvvvvvvvvvvvvvvvvvvvvvvvvvvvvvvvvvvvvvvvvvvvvvvvvvvvvvvvvvvvvvvvvvvvvvvvvvvvvvvvvvvvvvvvvvvvvvvvvvv
# Openwrt : Drop XMAS, Null first, then invalid packets (these 3 come before other rules)
#
# XMAS packets
/sbin/iptables -t raw -A PREROUTING -p tcp -m tcp --tcp-flags ALL ALL -j DROP -m comment --comment "Drop XMAS packets"
# Drop all NULL packets
/sbin/iptables -t raw -A PREROUTING -p tcp -m tcp --tcp-flags ALL NONE -j DROP -m comment --comment "Drop all NULL packets"
##^^^^^^^^^^^^^^^^^^^^^^^^^^^^^^^^^^^^^^^^^^^^^^^^^^^^^^^^^^^^^^^^^^^^^^^^^^^^^^^^^^^^^^^^^^^^^^^^^^^^^^^^^^^^^^^^^^^^^^

# Enable loopback traffic
/sbin/iptables -A INPUT  -i lo -j ACCEPT

# Enable statefull rules (after that, only need to allow NEW conections)
/sbin/iptables -A INPUT   -m conntrack --ctstate ESTABLISHED,RELATED -j ACCEPT
/sbin/iptables -A FORWARD -m conntrack --ctstate ESTABLISHED,RELATED -j ACCEPT

# eth0 - WAN, eth1 - LAN, this will allow your internal to access the external:
/sbin/iptables -t nat -A POSTROUTING -o $EXTIF -j MASQUERADE
/sbin/iptables -A FORWARD -i $INTIF -o $EXTIF -j ACCEPT

# DNS - accept from LAN
/sbin/iptables -A INPUT -i $INTIF -p tcp --dport 53 -j ACCEPT -m comment --comment "Accept DNS from LAN"
/sbin/iptables -A INPUT -i $INTIF -p udp --dport 53 -j ACCEPT -m comment --comment "Accept DNS from LAN"

## Protection 2 vvvvvvvvvvvvvvvvvvvvvvvvvvvvvvvvvvvvvvvvvvvvvvvvvvvvvvvvvvvvvvvvvvvvvvvvvvvvvvvvvvvvvvvvvvvvvvvvvvvvvvvv
# Drop Invalid Packets
# Drop invalid state packets
/sbin/iptables -A INPUT   -m conntrack --ctstate INVALID -j DROP -m comment --comment "Drop Invalid INPUT Packets"
/sbin/iptables -A OUTPUT  -m conntrack --ctstate INVALID -j DROP -m comment --comment "Drop Invalid OUTPUT Packets"
/sbin/iptables -A FORWARD -m conntrack --ctstate INVALID -j DROP -m comment --comment "Drop Invalid FORWARD Packets"

# Force Fragments packets check
/sbin/iptables -A INPUT -f -j DROP -m comment --comment "Force Fragments packets check"

# Reject spoofed packets
/sbin/iptables -A INPUT -i $EXTIF -s 169.254.0.0/16 -j DROP
/sbin/iptables -A INPUT -i $EXTIF -s 172.16.0.0/12 -j DROP
/sbin/iptables -A INPUT -i $EXTIF -s 127.0.0.0/8 -j DROP

#Multicast-adresses.
/sbin/iptables -A INPUT -i $EXTIF -s 224.0.0.0/4 -j DROP
/sbin/iptables -A INPUT -i $EXTIF -d 224.0.0.0/4 -j DROP
/sbin/iptables -A INPUT -i $EXTIF -s 240.0.0.0/5 -j DROP
/sbin/iptables -A INPUT -i $EXTIF -d 240.0.0.0/5 -j DROP
/sbin/iptables -A INPUT -i $EXTIF -s 0.0.0.0/8 -j DROP
/sbin/iptables -A INPUT -i $EXTIF -d 0.0.0.0/8 -j DROP
/sbin/iptables -A INPUT -i $EXTIF -d 239.255.255.0/24 -j DROP
/sbin/iptables -A INPUT -i $EXTIF -d 255.255.255.255 -j DROP

# SYN Flood Protection
/sbin/iptables -A INPUT -p tcp -m tcp --tcp-flags FIN,SYN,RST,ACK SYN -j syn_flood
/sbin/iptables -A syn_flood -p tcp -m tcp --tcp-flags FIN,SYN,RST,ACK SYN -m limit --limit 25/sec --limit-burst 50 -j RETURN
/sbin/iptables -A syn_flood -j DROP
##^^^^^^^^^^^^^^^^^^^^^^^^^^^^^^^^^^^^^^^^^^^^^^^^^^^^^^^^^^^^^^^^^^^^^^^^^^^^^^^^^^^^^^^^^^^^^^^^^^^^^^^^^^^^^^^^^^^^^^

# Allow HTTP to this Router
/sbin/iptables -A INPUT -i $INTIF -p tcp --dport 80 -j ACCEPT -m comment --comment "Accept HTTP from LAN"

# Allow SSH with brute-force attack protection from WAN
/sbin/iptables -A INPUT -i $EXTIF -p tcp -m tcp --dport $SSHPORT -m state --state NEW -m recent --set --name SSH_LIMIT --rsource
/sbin/iptables -A INPUT -i $EXTIF -p tcp --dport $SSHPORT -m state --state NEW -m recent --update --seconds 60 --hitcount 3 --name SSH_LIMIT --rsource -j DROP
/sbin/iptables -A INPUT -p tcp -m tcp --dport $SSHPORT -j ACCEPT -m comment --comment "Accept ssh from both WAN and LAN"

# DHCP client requests - accept from LAN
/sbin/iptables -A INPUT -i $INTIF -p udp --dport 67:68 -j ACCEPT -m comment --comment "Accept DHCP requests from LAN"

# Allow ping from LAN
iptables -A INPUT -i $INTIF -p icmp --icmp-type echo-request -j ACCEPT -m comment --comment "Accept Ping request from LAN"
iptables -A OUTPUT -o $INTIF -p icmp --icmp-type echo-reply -j ACCEPT -m comment --comment "Accept Ping reply to LAN"
if-up.d 部分,创建 /etc/network/if-up.d/my-post-up :
#!/bin/sh
EXTIF=eth0
if [ "$IFACE" = "$EXTIF" ]; then
    /bin/sh /usr/myscripts/iptables/post-up-rules
fi
创建 /usr/myscripts/iptables/post-up-rules :
#!/bin/sh

EXTIF=eth0
INTIF=br0

LOG=/tmp/set-rules-router.log

WANIP=$(/sbin/ifconfig $EXTIF | grep 'inet addr:' | cut -d: -f2 | awk '{ print $1}')
echo "POST-UP : `date`" | tee -a $LOG
echo "$IFACE post-up, $EXTIF IP : $WANIP" | tee -a $LOG
echo | tee -a $LOG
if [ -z "$WANIP" ]; then
        exit;
fi


get_network(){
    ip=$1
    baseip=$(echo $ip | cut -d"." -f1-3)
    echo $baseip".0"
}


LANIP=$(/sbin/ifconfig $INTIF | grep 'inet addr:' | cut -d: -f2 | awk '{ print $1}')
NETWORK=$(get_network "$LANIP")

PC2="10.0.1.130";                # Web server internal IP
MAIL="10.0.1.131";                # mail server internal IP
HTTPS_PORT=12310;
IMAPS_PORT=12311;
POP3S_PORT=12312;


## PORT FORWARDING vvvvvvvvvvvvvvvvvvvvvvvvvvvvvvvvvvvvvvvvvvvvvvvvvvvvvvvvvvvvvvvvvvvvvvvvvvvvvvvvvvvvvvvvvvvvvvvvvvvvv
# HTTPS to Web Server
/sbin/iptables -t nat -A PREROUTING -d $WANIP -p tcp --dport $HTTPS_PORT -j DNAT --to-destination $PC2:$HTTPS_PORT -m comment --comment "Port Forwarding to PC2"
/sbin/iptables -A FORWARD -p tcp -d $PC2 --dport $HTTPS_PORT -m state --state NEW,ESTABLISHED,RELATED -j ACCEPT
/sbin/iptables -A POSTROUTING -t nat -s $NETWORK/24 -d $PC2/32 -p tcp -m tcp --dport $HTTPS_PORT -j SNAT --to-source $LANIP


# Mail Server
/sbin/iptables -t nat -A PREROUTING -d $WANIP -p tcp --dport 25 -j DNAT --to-destination $MAIL:25 -m comment --comment "Port Forwarding SMTP"
/sbin/iptables -t nat -A PREROUTING -d $WANIP -p tcp --dport 465 -j DNAT --to-destination $MAIL:465 -m comment --comment "Port Forwarding SMTPs"
/sbin/iptables -t nat -A PREROUTING -d $WANIP -p tcp --dport 587 -j DNAT --to-destination $MAIL:587 -m comment --comment "Port Forwarding Submission"
/sbin/iptables -t nat -A PREROUTING -d $WANIP -p tcp --dport $IMAPS_PORT -j DNAT --to-destination $MAIL:993 -m comment --comment "Port Forwarding IMAPs"
/sbin/iptables -t nat -A PREROUTING -d $WANIP -p tcp --dport $POP3S_PORT -j DNAT --to-destination $MAIL:995 -m comment --comment "Port Forwarding POP3s"
/sbin/iptables -A FORWARD -p tcp -d $MAIL -m multiport --dport 25,465,587,993,995 -m state --state NEW,ESTABLISHED,RELATED -j ACCEPT
/sbin/iptables -A POSTROUTING -t nat -s $NETWORK/24 -d $MAIL/32 -p tcp -m tcp --dport 25 -j SNAT --to-source $LANIP
/sbin/iptables -A POSTROUTING -t nat -s $NETWORK/24 -d $MAIL/32 -p tcp -m tcp --dport 465 -j SNAT --to-source $LANIP
/sbin/iptables -A POSTROUTING -t nat -s $NETWORK/24 -d $MAIL/32 -p tcp -m tcp --dport 587 -j SNAT --to-source $LANIP
/sbin/iptables -A POSTROUTING -t nat -s $NETWORK/24 -d $MAIL/32 -p tcp -m tcp --dport 993 -j SNAT --to-source $LANIP
/sbin/iptables -A POSTROUTING -t nat -s $NETWORK/24 -d $MAIL/32 -p tcp -m tcp --dport 995 -j SNAT --to-source $LANIP
##^^^^^^^^^^^^^^^^^^^^^^^^^^^^^^^^^^^^^^^^^^^^^^^^^^^^^^^^^^^^^^^^^^^^^^^^^^^^^^^^^^^^^^^^^^^^^^^^^^^^^^^^^^^^^^^^^^^^^^
将以上四个脚本设为“可执行”: chmod +x filename。重启 ...现在终于可以经这个路由上网了!
6. DDNS
我没有固定 IP,所以要用 DDNS。我用的是 dnsexit(免费、收费都有),更新 DNS 非常简单 - 在 /etc/rc.local 执行以下脚本就行。
/usr/myscripts/update-ddns
#!/bin/bash

USER=username;
PASSWORD=updatepassword;
DOMAINS=(domain1.net domain2.net);                # multiple domains at the same IP separated by spaces

LOG=/tmp/update-ddns.log

echo "* $(date)" | tee -a $LOG
echo | tee -a $LOG

echo "Updating DDNS to dnsexit ..."
for domain in "${DOMAINS[@]}"; do
    url="http://update.dnsexit.com/RemoteUpdate.sv?login=$USER&password=$PASSWORD&host=$domain";
    echo $url | tee -a $LOG
    result=$(curl -s $url)
    echo "$result"  | tee -a $LOG
    echo  | tee -a $LOG
done
echo | tee -a $LOG
当然要 chmod +x /usr/myscripts/update-ddns 将这脚本设为“可执行”。
7. overlayroot
我们当然要求软路由能经得起断电而系统不坏,系统不会在我们不想改变的时候有任何变化。所以我使用了 overlayroot。
apt-get install overlayroot
其实上面的是不需要的,因为 Ubuntu 已经预装了 overlayroot。
修改 /etc/overlayroot.conf,将 overlayroot="" 改为:
overlayroot="tmpfs"
重启系统后,整个 root filesystem 已经被保护了。之后的任何改变,都会在重启之后恢复回之前的状态。
之后如果确实要改变系统,可以输入 overlayroot-chroot 进入真实的档案系统,然后修改 /etc/overlayroot.conf,改回 overlayroot="",重启 ... 这样就停用了 overlayroot。
详细可以参考:https://spin.atomicobject.com/2015/03/10/protecting-ubuntu-root-filesystem/。
8. 其他脚本
我测试过把 WAN 口网线拔掉重插,if-pre-up.d 和 if-up.d 并没有触发。这就让我担心掉线之后会不会不能上网,或者 ip
改变导致 dns 和 port forwarding 规则失败。其实最佳的解决办法可能是用 ip monitor address 然后
grep,一直监视 WAN 口。但我在网上找到 ip monitor address 的例子非常少,而且也不知道怎样改变地址来测试,所以只能用
cron。每隔 5分钟或者10分钟检查一遍。
脚本不贴出来了,在附件里面。 other-scripts.zip
vars : 存储 ping-sites 和 dns-check 两个脚本通用的资料。
ping-sites : ping 一些外面的网站,第一次不通,ifdown && ifup;连续第二次不通,reboot。
dns-check : 比较 authoritative servers 和 WAN 口的 ip 地址,并且检查 port forwarding 规则是不是含正确的 ip。
send-mail : 发送 email 的脚本。
9. WAN-to-LAN 速度测试
测试环境:
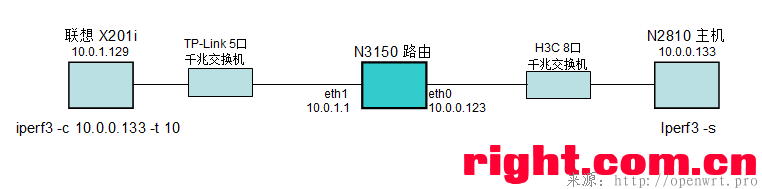
al@DESKTOP-CFK04JL:~$ iperf3 -c 10.0.0.133 -t 10
Connecting to host 10.0.0.133, port 5201
[  4] local 10.0.1.29 port 41268 connected to 10.0.0.133 port 5201
[ ID] Interval           Transfer     Bandwidth       Retr  Cwnd
[  4]   0.00-1.00   sec   111 MBytes   929 Mbits/sec    0    731 KBytes
[  4]   1.00-2.00   sec   110 MBytes   923 Mbits/sec    0   1.07 MBytes
[  4]   2.00-3.00   sec   109 MBytes   912 Mbits/sec    0   1.07 MBytes
[  4]   3.00-4.00   sec   110 MBytes   923 Mbits/sec    0   1.07 MBytes
[  4]   4.00-5.00   sec   111 MBytes   933 Mbits/sec    0   1.07 MBytes
[  4]   5.00-6.00   sec   109 MBytes   912 Mbits/sec    0   1.07 MBytes
[  4]   6.00-7.00   sec   109 MBytes   912 Mbits/sec    0   1.07 MBytes
[  4]   7.00-8.00   sec   108 MBytes   902 Mbits/sec    0   1.13 MBytes
[  4]   8.00-9.00   sec   109 MBytes   912 Mbits/sec    0   1.13 MBytes
[  4]   9.00-10.00  sec   109 MBytes   912 Mbits/sec    0   1.13 MBytes
- - - - - - - - - - - - - - - - - - - - - - - - -
[ ID] Interval           Transfer     Bandwidth       Retr
[  4]   0.00-10.00  sec  1.07 GBytes   917 Mbits/sec    0             sender
[  4]   0.00-10.00  sec  1.06 GBytes   914 Mbits/sec                  receiver

iperf Done.
al@DESKTOP-CFK04JL:~$ iperf3 -c 10.0.0.133 -t 10
Connecting to host 10.0.0.133, port 5201
[  4] local 10.0.1.29 port 41272 connected to 10.0.0.133 port 5201
[ ID] Interval           Transfer     Bandwidth       Retr  Cwnd
[  4]   0.00-1.00   sec   108 MBytes   906 Mbits/sec    0   1.04 MBytes
[  4]   1.00-2.00   sec   110 MBytes   923 Mbits/sec    0   1.04 MBytes
[  4]   2.00-3.00   sec   111 MBytes   933 Mbits/sec    0   1.04 MBytes
[  4]   3.00-4.00   sec   110 MBytes   923 Mbits/sec    0   1.33 MBytes
[  4]   4.00-5.00   sec   110 MBytes   923 Mbits/sec    0   1.33 MBytes
[  4]   5.00-6.00   sec   111 MBytes   933 Mbits/sec    0   1.33 MBytes
[  4]   6.00-7.00   sec   109 MBytes   912 Mbits/sec    0   1.33 MBytes
[  4]   7.00-8.00   sec   111 MBytes   933 Mbits/sec    0   1.33 MBytes
[  4]   8.00-9.00   sec   110 MBytes   923 Mbits/sec    0   1.33 MBytes
[  4]   9.00-10.00  sec   110 MBytes   923 Mbits/sec    0   1.33 MBytes
- - - - - - - - - - - - - - - - - - - - - - - - -
[ ID] Interval           Transfer     Bandwidth       Retr
[  4]   0.00-10.00  sec  1.07 GBytes   923 Mbits/sec    0             sender
[  4]   0.00-10.00  sec  1.07 GBytes   920 Mbits/sec                  receiver

iperf Done.
al@DESKTOP-CFK04JL:~$
WAN-to-LAN 速度 > 900 Mbits/sec,满意!
sysctl.conf
部分设定是希望增加 Network throughput 的,可是测试过,没看到区别。
部分设定是增加安全的(参考了一些网页,还有 ipcop, clearOS, debian 等系统)。
因为 sysctl.conf 已经设置了,所以 1楼的 /usr/myscripts/iptables/pre-up-rules 可以去掉下面几行:
# Ref : https://wiki.debian.org/DebianFirewall
#echo -n '1' > /proc/sys/net/ipv4/ip_forward
#echo -n '0' > /proc/sys/net/ipv4/conf/all/accept_source_route
#echo -n '0' > /proc/sys/net/ipv4/conf/all/accept_redirects
#echo -n '1' > /proc/sys/net/ipv4/icmp_echo_ignore_broadcasts
#echo -n '1' > /proc/sys/net/ipv4/icmp_ignore_bogus_error_responses
#
# /etc/sysctl.conf - Configuration file for setting system variables
# See /etc/sysctl.d/ for additional system variables.
# See sysctl.conf (5) for information.
#

#kernel.domainname = example.com

# Uncomment the following to stop low-level messages on console
#kernel.printk = 3 4 1 3

##############################################################3
# Functions previously found in netbase
#

# Uncomment the next two lines to enable Spoof protection (reverse-path filter)
# Turn on Source Address Verification in all interfaces to
# prevent some spoofing attacks
#net.ipv4.conf.default.rp_filter=1
#net.ipv4.conf.all.rp_filter=1

# Uncomment the next line to enable TCP/IP SYN cookies
# See http://lwn.net/Articles/277146/
# Note: This may impact IPv6 TCP sessions too
#net.ipv4.tcp_syncookies=1

# Uncomment the next line to enable packet forwarding for IPv4
net.ipv4.ip_forward=1

# Uncomment the next line to enable packet forwarding for IPv6
#  Enabling this option disables Stateless Address Autoconfiguration
#  based on Router Advertisements for this host
#net.ipv6.conf.all.forwarding=1


###################################################################
# Additional settings - these settings can improve the network
# security of the host and prevent against some network attacks
# including spoofing attacks and man in the middle attacks through
# redirection. Some network environments, however, require that these
# settings are disabled so review and enable them as needed.
#
# Do not accept ICMP redirects (prevent MITM attacks)
#net.ipv4.conf.all.accept_redirects = 0
#net.ipv6.conf.all.accept_redirects = 0
# _or_
# Accept ICMP redirects only for gateways listed in our default
# gateway list (enabled by default)
# net.ipv4.conf.all.secure_redirects = 1
#
# Do not send ICMP redirects (we are not a router)
#net.ipv4.conf.all.send_redirects = 0
#
# Do not accept IP source route packets (we are not a router)
#net.ipv4.conf.all.accept_source_route = 0
#net.ipv6.conf.all.accept_source_route = 0
#
# Log Martian Packets
#net.ipv4.conf.all.log_martians = 1
#

# disable ipv6
net.ipv6.conf.all.disable_ipv6 = 1
net.ipv6.conf.default.disable_ipv6 = 1
net.ipv6.conf.lo.disable_ipv6 = 1
net.ipv6.conf.eth0.disable_ipv6 = 1


# https://easyengine.io/tutorials/linux/sysctl-conf/
### IMPROVE SYSTEM MEMORY MANAGEMENT ###

# Increase size of file handles and inode cache
fs.file-max = 2097152

# Do less swapping
vm.swappiness = 5
vm.dirty_ratio = 60
vm.dirty_background_ratio = 2

### GENERAL NETWORK SECURITY OPTIONS ###

# Number of times SYNACKs for passive TCP connection.
net.ipv4.tcp_synack_retries = 2

# Allowed local port range
net.ipv4.ip_local_port_range = 2000 65535

# Protect Against TCP Time-Wait
net.ipv4.tcp_rfc1337 = 1

# Decrease the time default value for tcp_fin_timeout connection
net.ipv4.tcp_fin_timeout = 15

# Decrease the time default value for connections to keep alive
net.ipv4.tcp_keepalive_time = 300
net.ipv4.tcp_keepalive_probes = 5
net.ipv4.tcp_keepalive_intvl = 15

### TUNING NETWORK PERFORMANCE ###

# Default Socket Receive Buffer
net.core.rmem_default = 31457280

# Maximum Socket Receive Buffer
net.core.rmem_max = 12582912

# Default Socket Send Buffer
net.core.wmem_default = 31457280

# Maximum Socket Send Buffer
net.core.wmem_max = 12582912

# Increase number of incoming connections
net.core.somaxconn = 4096

# Increase number of incoming connections backlog
net.core.netdev_max_backlog = 65536

# Increase the maximum amount of option memory buffers
net.core.optmem_max = 25165824

# Increase the maximum total buffer-space allocatable
# This is measured in units of pages (4096 bytes)
net.ipv4.tcp_mem = 65536 131072 262144
net.ipv4.udp_mem = 65536 131072 262144

# Increase the read-buffer space allocatable
net.ipv4.tcp_rmem = 8192 87380 16777216
net.ipv4.udp_rmem_min = 16384

# Increase the write-buffer-space allocatable
net.ipv4.tcp_wmem = 8192 65536 16777216
net.ipv4.udp_wmem_min = 16384

# Increase the tcp-time-wait buckets pool size to prevent simple DOS attacks
net.ipv4.tcp_max_tw_buckets = 1440000
net.ipv4.tcp_tw_recycle = 1
net.ipv4.tcp_tw_reuse = 1


# Additional setting with reference to ipcop/clearos
net.ipv4.ip_dynaddr = 1

# rp_filter = 1, source address verification helps protect against spoofing attacks
net.ipv4.conf.default.rp_filter = 1
net.ipv4.conf.default.accept_redirects = 0
net.ipv4.conf.default.send_redirects = 0
net.ipv4.conf.default.accept_source_route = 0
#net.ipv4.conf.default.log_martians = 1
net.ipv4.conf.default.promote_secondaries = 1

net.ipv4.conf.all.rp_filter = 1
net.ipv4.conf.all.accept_redirects = 0
net.ipv4.conf.all.send_redirects = 0
net.ipv4.conf.all.accept_source_route = 0
#net.ipv4.conf.all.log_martians = 1
net.ipv4.conf.all.promote_secondaries = 1

# also suggested by Debian
net.ipv4.icmp_echo_ignore_broadcasts = 1
net.ipv4.icmp_ignore_bogus_error_responses = 1
目前就做成这样,先用一段时间看看有什么要修改的。
参考网页:
https://arstechnica.com/gadgets/2016/04/the-ars-guide-to-building-a-linux-router-from-scratch/
https://arstechnica.com/gadgets/2016/01/numbers-dont-lie-its-time-to-build-your-own-router/
.........