上一章节已经将远程和本地的U-boot服务器都搭建完成了,现在我们要开始真正的编译我们所clone的U-boot是否能正常,烧录进去是否能带动板子呢?
1.在配置编译之前,我们需要把编译器gcc先安装好,在网上下载MTK的SDK,如MediaTek_ApSoC_SDK_4320_20150414.tar.bz2,解压后将里面的buildroot-gcc342.tar.bz2复制到/opt/目录下进行解压即可,如下:
linye@ly:~/XiaomiRouter$ tar -jxvf MediaTek_ApSoC_SDK_4320_20150414.tar.bz2
linye@ly:~/XiaomiRouter$ cd RT288x_SDK/toolchain/
linye@ly:~/XiaomiRouter/RT288x_SDK/toolchain$ cp buildroot-gcc342.tar.bz2 /opt/
linye@ly:~/XiaomiRouter/RT288x_SDK/toolchain$ cd /opt/
linye@ly:/opt$ tar -jxvf buildroot-gcc342.tar.bz2
对于环境的搭建不同版本的Ubuntu可能会有不同,遇到问题时自己到网络上找下解决方案,gcc解压到/opt/目录后,U-boot在make时会自动查找gcc所在的位置,所以我们只需要解压即可。
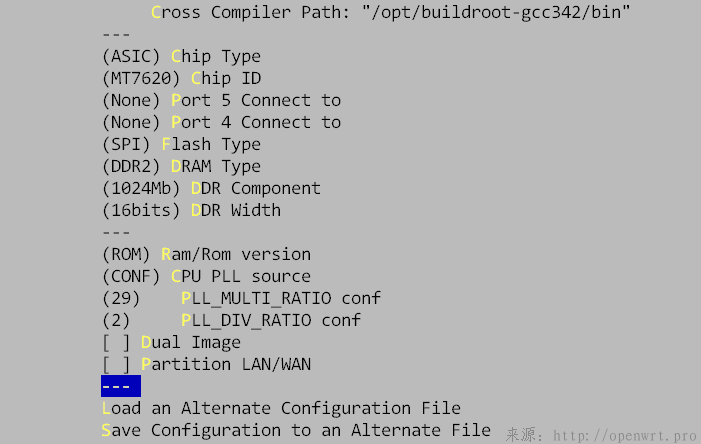
2.通过make menuconfig进行配置U-boot,会出现GUI配置页面,我们进行如下选择
make menuconfig
对选项进行解析下,
Chip Type(ASIC):application-specific integrated circuit专用集成电路
Chip ID(MT7620):主芯片型号
Flash Type(SPI):小米mini路由器使用的是16M的SPI Flash
DRAM Type(DDR2):使用的是NT5TU64M16芯片,参看官方手册为1Gb、16bits的DDR2,所以下面两个选项为DDR Component(1024Mb)和DDR Width(16bits)
Ram/Rom version(ROM):SPI Flash为ROM
CPU PLL source(CONF):与PLL_MULTI_RATIO conf(29)和PLL_DIV_RATIO conf(2)共同来决定CPU的是在频率,PLL source一共有三种模式AUX0/AUX1/CONF,有兴趣的可以去追查下代码,到后面会在/tools/mkimage.c里面调用以下信息进行PLL选择
#if defined (CPLL_FROM_480MHZ)
 cpu_pll = ntohs(1<<11);#elif defined (CPLL_FROM_XTAL)
 cpu_pll = ntohs(1<<12);#else
 cpu_pll = ntohs((CPLL_MULTI_RATIO_CFG<<8)|(CPLL_DIV_RATIO_CFG<<6)|(CPLL_SSC_CFG<<0));#endif
寄存器的介绍可以查看MT7620_ProgrammingGuide的33页CPLL_CFG0寄存器。
其他几个配置项暂时不知道怎么用,后面明白时进行更新。
3.配置后通过make命令进行编译,编译完成会出现如下错误
fsdata.c:314: error: parse error before ',' token
make[1]: *** [fs.o] Error 1
make[1]: Leaving directory `/home/linye/XiaomiRouter/U-boot/httpd'
make: *** [httpd/libhttpd.a] Error 2
4.错误提示httpd/fsdata.c的314行有误,我们打开该文件看下,可以很清楚的看到多了一个逗号,去掉即可,再执行make进行编译,如下信息及编译成功
===============<<IMPORTANT>>==================
Notes:Uboot firmware is uboot.bin NOT uboot.img
================================================

./tools/mkimage -A mips -T standalone -C none \
                -a 0xBC000000 -e 0xbc000000 \
                -n "SPI Flash Image" \
                -r DDR -s 16 -t 128 -u 32 \
                -y 0xFF -z 0xFF -w 0xFF -d uboot.bin uboot.img
Image Name:   SPI Flas
Created:      Fri Feb 10 14:03:16 2017
Image Type:   MIPS Linux Standalone Program (uncompressed)
Data Size:    124804 Bytes = 121.88 kB = 0.12 MB
Load Address: 0xBC000000
Entry Point:  0xBC000000
DRAM Parameter: 2b (Parm0=0 Parm1=0)
5.在目录下会生成uboot.bin文件,将这个文件cp到window,使用SPI烧录器进行烧录,然后将flash重新装回插座口上电。如果一切都正常的话,console应该会出现类似下面的乱码
榾鎬榾鎬f骀?烚瀈??骧唦`?骧唦`?骧唦`??榾鎬榾鎬f骀?烚?
6.观察到能打印信息但是乱码,应该是波特率有问题,所以尝试着更改下secureCRT的波特率,可以得到当波特率为57600时,可以正常打印如下信息:
U-Boot 1.1.3 (Feb  9 2017 - 05:56:34)

Board: Ralink APSoC DRAM:  128 MB
GPIO#44 updated GPIOMODE register: 001a311c -> 001ab11c
MT7620 Ai-BR100 gpio init : WPS / RESET pin
relocate_code Pointer at: 87fb0000
enable ephy clock...done. rf reg 29 = 5SSC disabled.
spi_wait_nsec: 29 spi device id: ef 40 14 0 0 (40140000)Warning: un-recognized chip ID, please update bootloader!
raspi_read: from:20000 len:1000 *** Warning - bad CRC, using default environment

============================================
CleanWRT u-boot_mt7620 Version: 0.0.0.1-------------------------------------------- ASIC 7620_MP (Port5<->None)
DRAM component: 1024 Mbits DDR, width 16DRAM bus: 16 bitTotal memory: 128 MBytes
Flash component: SPI Flash
Date:Feb  9 2017  Time:05:56:34============================================
icache: sets:512, ways:4, linesz:32 ,total:65536dcache: sets:256, ways:4, linesz:32 ,total:32768

 ##### The CPU freq = 580 MHZ ####
 estimate memory size =128 Mbytes

Press press WPS button for more than 2 seconds to run web failsafe mode

WPS button is pressed for:  0 second(s)

Catution: WPS button wasn't pressed or not long enough!
Continuing normal boot...

Please choose the operation:
   0: System Load Linux then write to Flash via Serial.
   1: Load system code to SDRAM via TFTP.
   2: Load system code then write to Flash via TFTP.
   3: Boot system code via Flash (default).   4: Entr boot command line interface.   7: Load Boot Loader code then write to Flash via Serial.
   8: System Load UBoot to SDRAM via TFTP.
   9: Load Boot Loader code then write to Flash via TFTP.
 3
7.在倒计时的时候直接按Enter键发现不是进入命令行,使用的是默认选项3,直接bootm,但又没有内核,所以卡住
3: System Boot system code via Flash.
## Booting image at bc040000 ...
raspi_read: from:40000 len:40 Bad Magic Number,FFFFFFFF
8.观察提示可以输入4则进入命令行模式,进行操作,可以自己试下
You choosed 4

 0
raspi_read: from:30028 len:6


4: System Enter Boot Command Line Interface.

U-Boot 1.1.3 (Feb  9 2017 - 05:56:34)
MT7620 # MT7620 # pribootcmd=tftp
bootdelay=5
baudrate=57600
ethaddr="24:0A:64:FE:47:BB"
ipaddr=192.168.128.1
serverip=192.168.128.32
stdin=serial
stdout=serial
stderr=serial

Environment size: 154/4092 bytes
MT7620 #
9.输入9则进入TFTP更新模式,当选择9后,会提示你是否确认擦出Uboot进行tftp更新,然后就是设置ip,输入uboot的名称,把网址的ip地址设置为192.168.128.32,将Tfthd32打开,并定位到uboot.bin所放的位置,设置完成后按Enter键即可,如果一切设置正常则会出现如下过程。
 Warning!! Erase Boot Loader in Flash then burn new one. Are you sure?(Y/N)
 Please Input new ones /or Ctrl-C to discard
        Input device IP (192.168.128.1) ==:192.168.128.1
        Input server IP (192.168.128.32) ==:192.168.128.32
        Input Uboot filename () ==:uboot.bin

 netboot_common, argc= 3

 NetTxPacket = 0x87FE6C40

 KSEG1ADDR(NetTxPacket) = 0xA7FE6C40

 NetLoop,call eth_halt !

 NetLoop,call eth_init !
Trying Eth0 (10/100-M)

 Waitting for RX_DMA_BUSY status Start... done


 ETH_STATE_ACTIVE!!
TFTP from server 192.168.128.32; our IP address is 192.168.128.1Filename 'uboot.bin'.

 TIMEOUT_COUNT=10,Load address: 0x80100000Loading: Got ARP REPLY, set server/gtwy eth addr (00:0c:07:14:05:2d)
Got it
#########################
done
Bytes transferred = 124164 (1e504 hex)
NetBootFileXferSize= 0001e504raspi_erase_write: offs:0, count:1e504raspi_erase: offs:0 len:10000.
raspi_write: 80100000 to:0 len:10000 .
raspi_read: from:0 len:10000 raspi_read: from:10000 len:10000 raspi_erase: offs:10000 len:10000.
raspi_write: 87f711f0 to:10000 len:10000 .
raspi_read: from:10000 len:10000 Done!


U-Boot 1.1.3 (Feb 10 2017 - 21:39:25)
可以观察到tftp服务器检测到网络正常并uboot.bin存在时,就会将uboot.bin上传到0x80100000地址,然后将spi flash里面原本的uboot擦除掉,把新的uboot写进去后重启。
U-boot配置编译烧录的分析就到这边,有感悟时会持续会更新。